About Me

My photo
Liverpool, Liverpool, United Kingdom
I have been crafting since May 2008, when in desperation to find an unusual birthday card for my Mum, I gave up looking in the shops and decided to have a go at making my own. I soon realised that crafting is addictive and I haven't brought a card since. In 2011 I completed my certificate in papercrafting as a result of the work I did as part of the course I started entering challenges on line and in magazines. I applied for design teams and also started making samples for Ooh La La Creations for their shows on Create and Craft. I have now completed my Diploma in professional crafting and most recently been runner up in the Papercrafter of the Year 2013 a competition run by Papercraft essentials magazine, I don't have a particular style I like to use elements from lots of styles and techniques, although I do love all things vintage. In 2014 I started to move more towards scrapbooking to take care of the huge family archive of photographs that were stored in my attic. I have continued cardmaking and Scrapbooking through 2015 and 2016 but have also become interested in off the page projects. I hope to be able focus on these in the future.

Friday 29 March 2013

For a special friend

My dearest friend celebrates her birthday soon and I wanted something a little bit special for her birthday. I know she likes shabby chic styling and that her current passion is polka dots so I came up with this
 

I started with the image from Ooh La La Creations' everyday occasions CD because the sentiment says it all.  I also found the pale pink polka dot paper on the CD and then added a grey polka
dot paper and a happy birthday paper from my stash. I roughened the edges of the paper with scissors to give a shabby effect. A doily was added to give a lovely feminine effect.  I added a piece of folded gauze behind the sentiment and added a flower spray of carnations (her favourite flowers) and roses from Wild Orchid crafts. Two bows tied in pink polka dot ribbon, strings of pearls, a silver butterfly and some pretty buttons in the shape of bows and some plain cream buttons complete the design. 


I continued the polka dot and shabby chic effect inside the card by using the same polka dot papers and another doily inside the card.

I am entering this card into the following challenges 
http://trimmiescraftchallenge.blogspot.co.uk/ - female
http://incywincydesigns.blogspot.co.uk/ - pastels
http://wildorchidchallenge.blogspot.co.uk/ - buttons and bows

Wednesday 27 March 2013

Noel

Another card from the recycling bag.


The lovely embossed panel was the front of one of the cards in the recycling bag I stuck it onto red paper and then trimmed to leave a really narrow border then mounted this onto a green base card. I added the three die cut flowers and the little metallic twists at the bottom corner to finish.

I am entering this card into the following challenges


http://craftyhazelnutschristmaschallenge.blogspot.co.uk/ - use three of something - 3 flowers
http://craftyhazelnutschristmaschallenge2.blogspot.co.uk/ - Anything goes so long as it's Christmas

Chrstmas Cas


I used a Memory Box die to cut the Poinsettia shape from green and red felt, I then used the matching memory box stamp and momento ink to add the detail to the flower I also stamped a third image to get the centre of the flower onto a scrap of red felt and then cut it out before layering the leaves and petals up. The finishing touch was to add small gold beads for the flower centre. I added a simple sentiment and three pearls using pearl paint.

I am entering this card into the following challenges 

http://craftyhazelnutschristmaschallenge.blogspot.co.uk/ - use three of something - 3 pearls
http://craftyhazelnutschristmaschallenge2.blogspot.co.uk/ - Anything goes so long as it's Christmas

Oh Snow not again!!!

With Easter almost upon us the UK is basking in yet more of the white stuff. I hope all my UK friends are doing OK we have been lucky so far and the latest snowfall - it stopped about ten minutes ago hasn't settled but I know some areas have been really badly hit.

All this winter weather has however kept me in the mood for making my recycled Christmas cards this is the latest to add to the total.


this is actually the whole front of one of the cards the gold and white embossed backing and the image of the snowy village with the cheeky robin perched on the spade handle seemed really fitting and needed to be used as a whole rather than cutting it up so to make it extra special I die cut some felt flowers and holly leaves and added these and three little gems to the corners.

I am entering this into the following challenges.

http://craftyhazelnutschristmaschallenge.blogspot.co.uk/ - use three of something - 3 flowers 3 gems
http://craftyhazelnutschristmaschallenge2.blogspot.co.uk/ - Anything goes so long as it's Christmas
http://abcchristmaschallenge.blogspot.co.uk/ - felt or fabric ( the flowers and holly leaves)

Bundle of Joy

This week at CD Sunday the challenge theme is Bundle of Joy. I came up with this.


I used two different Ooh La La Creations CDs to create this one. The image and the building blocks panel are from the 'Kidiwinks' and the spots and stripes backing papers and the bunting, tiny bows and 'little one' tag are from the 'Everyday Occasions' CD.

I added a doily, congratulations backing paper, die cut flourishes, silver peel off borders and corners, a teddy bear button ( actually it's two buttons I snipped the shank off the back of the teddy bear button and stuck him to a flat blue button), card candi, ribbon and lots of pearls - flat backed strings and painted ones- 


I decorated the inside of the card using the spots and stripes papers and I even made up a verse before adding a little wooden comforter which I had coloured with stickles distress glitter in baby blue - well what other colour could I have possibly used?

I am entering this card in the following challenges
http://cdsundaychallenge.blogspot.co.uk/ - Bundle of Joy
http://twistedtuesdaychallenges.blogspot.co.uk/ - Banners and Pearls

A touch of Deco

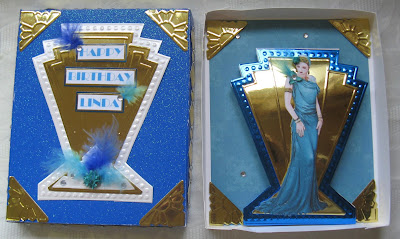
I have always loved the geometric motifs of Art Deco design and so was delighted to see that the All Sorts Challenge bog this week was all about Deco. My Sister-in-laws birthday is coming up and she is also into Art Deco pride of place in her living room is a gorgeous Art Deco mirror so this gave me the idea for a card to celebrate her special day.


I decided to use the Debbi Moore Deco Delights CD and as it was designed to work with the Deco embossing board from the Glitter Girls that was pressed into service too (pun fully intended) Because Deco is all about glamour I had some lovely deep blue glitter card and blue mirror card in my stash and decided to add gold for a truly decadent feel.


I chose the image from the CD and printed it onto white card then cut her out. I embossed the panels using the guides on the board and decided on this shape. The front and back of the card are joined by tiny folding tabs at the top and the bottom so that it stands up. Because the card doesn't open I added a plain white panel to the back for us to write on.


I also added the Deco corner motif at the base of the rear panel. To finish the card I added the small feathers and flowers to the lady's hat and shoulder.


For the lid of the box I embossed a white mirror card panel to frame the gold panel and printed the greetings using the computer and a font called Broadway which has a lovely Deco look to it. I added the embossed corners and gems and feathers and a single flower.


I also added the embossed diamond motif to the sides of the box lid and added more crystal gems. I added a lining to the box and the lid using one of the matching backing papers from the CD and highlighted the centre of the motifs with gems and added gold embossed corners. 

I am entering this card into the following challenges 

http://tuesdaythrowdown.blogspot.co.uk/ - What's in your basket - make something dimensional - the box 
http://pennyschallenges.blogspot.co.uk/ - anything but square 


Monday 25 March 2013

Butterfly basket birthday card

A colleague at work asked me to create a birthday card for her Aunt who is soon to celebrate her 75th birthday but she was insistent that I didn't use the number 75 on the card. Here is what I came up with


I used a mixture of backing papers the main one is from a MCS CD that I got a as a free gift called a little bit of everything, and the stripy panel is from the Papermania Spots and stripes capsule collection I layered these up with a paper doily. I cut the basket from card using a Marianne die and then threaded green ribbon through to add to the woven effect. I used the tiny flower die and cut the flowers from a pretty paper from crafty individuals using the printed flowers on the paper to get the shaded effect to my die cuts then added the gems to each flower as a centre. The flourish is a Memory Box die and the bird cage and butterfly are dies from crafty individuals. The branch and the tiny bird poised to take flight in the door of the bird cage are cut using Marianne dies and are the leaves and trailing ivy. 

I fussy cut the flying birds from some left over patterned paper. Lace was wrapped round the patterned pane and then I added  a sentiment threaded onto thin green ribbon. I used a punch to create the blossom on the branch and then added pearl centre using pearl paint.


Inside the card I used more paper from the free MCS CD and added a doily and die cut to a panel I had edged with silver peel off borders and corners. 

I am entering this card into the following challenges.
http://trimmiescraftchallenge.blogspot.co.uk/ - photo inspiration pink blossom branch

Friday 22 March 2013

Wonderful Wings - for CD Sunday

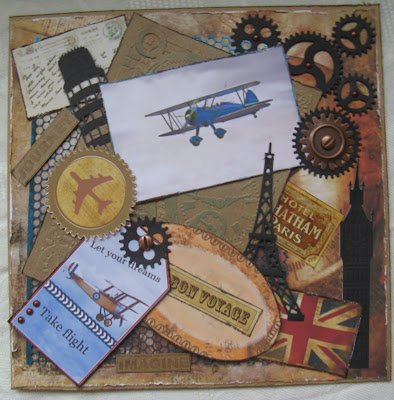
The Challenge this week at CD Sunday is wonderful wings. I decided to go down a male themed route with this bon voyage card


The backing paper, main image, tags, postcard and the union jack are all from the My Craft Studio Carousel of Classics CD box set I used Cds 1 and 2  which covers the period 1900-1939.

I added some sequin mesh on one side of the card in a vivid turquoise and embossed a panel of kraft card using the new chronology triboss embossing folder from Papermania. The Leaning tower of Pisa, Big Ben and the Eiffel Tower were die cut from plain black card using Marianne dies and the the cogs were cut using x-cut dies which go with the Papermania Chronology range.

To make the papers look older I distressed the edges and coloured them using momento ink in chocolate the embossed panel, image, tags, Union Jack and postcard were also distressed in a similar manner. The Kraft panel was also rubbed with tumbled glass distress ink to echo the blue of the sequin mesh and the background of the image and the plane tag.

The little hotel name plate is a sticker from the Tim Holtz ideology range and the finishing touches were the brads and metal cog from Papermania's Chronology range and the little copper pearls in the centres of the cogs and on the tag which were added using a pearl pen.

I am entering this into the following challenges
http://cdsundaychallenge.blogspot.co.uk/ - Wonderful Wings
http://challenges4everybody.blogspot.co.uk - Anything goes

Eight out of Ten Bunnies prefer Chocolate......

.....to carrots. Well this little fellow certainly does he's kicked all his carrots out of his secret hiding place in favour of yummy chocolate Easter eggs.


The lovely image is a digi which I downloaded from Nana Vics Digitals. The download has a coloured version of the image the digi stamp to colour a bunny without the background and the Happy Easter greeting.  I loved the way the bunny had been coloured on the pre coloured image but I wanted yellow tulips and the ones on the pre-coloured image were red. So I cut the pre coloured image of the bunny out, added a tiny pom-pom for a tail and fixed him over the bunny on the digi stamp after I coloured the background to get my yellow tulips. I printed another digi stamp as well and just coloured some of the tulip head which I then fixed over the coloured background to add depth.

I used Spectrum Noir markers to colour the background. I then die cut the image using sizzix hexagon dies and used a smaller die to cut the greeting, these were then backed with gold mirror card which I trimmed by hand to leave a narrow border. 

The papers were a freebie from a magazine and I overlapped the strips to form a square and then wrapped one edge with a pretty printed organza ribbon I had in my stash, before fixing the panel to an 8x8 card blank.
I added a bow at the top of the ribbon and stuck the sentiment to the centre of the bow.

The White fence was cut from plain white card using the small picket fence die from cottage cutz. I added the bunny image and put a die cut made using a Marianne leaves die behind it. 


The flowers were an assortment from my stash including fabric daisies from Petaloo they were originally all white but I coloured some of them green to form leaves. I added mini buttons from Papermania as the flower centres. The finishing touch were the bunnies now discarded carrots made by quilling three coils from orange paper and pushing them out to form the carrot shape before adding the leaves which were small sections of a green quilling strip that I had snipped to form thing leaves.

I am entering this card in the following challenges 

http://priscillastyles.ning.com/ - crafters digital art centre competition
http://oldiebutagoodiechallenge.blogspot.co.uk/ - Easter -The flowers have been in my stash for at least 3 years 


More Snow

Having just watched the news and seen the problems that a number of locations round Britain are having with the snow I feel quite lucky. Whilst we had snow through the night it turned to rain and the roads and for the most part the pavements round by me are clear. Although they are forecasting it will start snowing more heavily later on. As I can't actually build a snowman in my garden right now I came up with this Merry looking fellow instead.


I actually found him on one of the cards in the recycling bag and was able to peel him off his original pale coloured background and decided to add the die cut circles behind him and then add the greeting and the flourish and snow flakes. The Glitter paper was from a pack I received as part of a goody bag recently for getting a letter published in Papercraft Inspirations. Whilst the mirror card I found in my local craft shop. The finishing touch of the silver spirals were something I came up when we were out shopping and needed some sponge scourers for the kitchen, I spotted a pack of stainless steel scourers at 4 for 50p and came up with the idea of snipping bits off and teasing them out to form these spirals.

I am entering this card into the following challenges 
http://crimbo-crackers.blogspot.co.uk/ - No stamped images
http://craftyhazelnutschristmaschallenge.blogspot.co.uk/ - Merry and Bright
http://craftyhazelnutschristmaschallenge2.blogspot.co.uk/ - Anything goes so long as it's Christmas


Thursday 21 March 2013

Crafters digital art Centre Contest


WELCOME TO THE FANTASTIC

Easter/Spring Challenge & Contest BONANZA'S!!!
FOUR different ways to ENTER!!!
Deadline March 31st Midnight PST

CDAC and Petaloo are teaming up to bring you all of this excitement! This fun will run through the end of the month!! Lots of prizes will be awarded at the end of the month and we have four different ways to enter with multiple winners! Check them out below, follow the instructions and get in on all the excitement ! Along with some Gift Certificates from some wonderful Digi Artists, Petaloo is offering some AMAZING prizes. Petaloo International, is one of the largest floral manufacturing companies in the crafting world and is your source for floral & specialty embellishments. With exclusive factories in China, India, and Thailand, they have over 20 years experience in floral and craft products. They offer customers fun & innovative products at factory direct pricing. Here is just a "sample" of "some" of the prizes that will be awarded. Plus, Petaloo has a WHOLE NEW LINEof flowers coming out on April 1st that will also be part of these prizes. Don't miss out on being the "first on your block" to own some of these fabulous flowers!!!
Here are just a few of our prizes, so don't delay and GET STARTED TODAY!


Click on the link to enter

Monday 18 March 2013

It's a Man Thing at Ooh La La Creations

Happy Monday everyone, yes indeed it is a Man thing at Ooh La La Creations this week. Thanks for the lovely four legged friends you shared with us last time and congratulations to the winners you can see then by popping over to the Ooh La La Creations challenge blog and whilst yo are there you can see the DT inspiration for this weeks challenge.

I often see on forums that crafters struggle for ideas for mens' cards and I have far more male relatives than female so I get loads of practice with making male themed cards. However this year for my dad's birthday I wanted something different he usually gets a gardening related one as he loves his garden. So here is his birthday card which I am using for my DT card for this challenge as well.


All the images are from the Boys to Men CD 

I added my own die cut cut clouds to the blue backing paper and then matted and layered the papers up. The border is also from the CD and I used two different cloud design labels from the tags and sentiments folder and added my own text using my craft studio. The main image is one of Ooh La La's pyrimage images but I left a couple of layers out so it doesn't stand too proud.


Inside the card I used the base image of the pyrimage and expanded it and then reduced the opacity of the print so I could cut two matching sheets for lining the card. I added a blank oval using My Craft Studio and also added a sentiment that says it all about my Dad he has always been special and always my Dad.

I am entering the card into the following Challenges 
http://citycrafter.blogspot.co.uk/ - inspired by song,  'Would you like to ride in my beautiful balloon'
http://ppp-makeitmonday.blogspot.co.uk/ - Make it Monday Linky Party 

Saturday 16 March 2013

Bright and Blingy


I used a stripy red white and gold background paper and added a die cut oval of pearliesd paper. The letters were cut from one of the cards in the recycling bags and I added the holly leaves die cut from bright gold foil and the flowers cut from bright red pearlised paper. The letters were originally joined together when they were cut out but to get them to stretch across the full diagonal of the card they had to be separated. The bow hides a tiny notch out of the bottom of the N and the gold snowflake hides a notch out of the side of the side of the O, that were left during the separation process.

I am entering this into the following challenges
http://crimbo-crackers.blogspot.co.uk/ - No stamped images
http://craftyhazelnutschristmaschallenge.blogspot.co.uk/ - Merry and Bright
http://craftyhazelnutschristmaschallenge2.blogspot.co.uk/ - Anything goes so long as it's Christmas
http://trimmiescraftchallenge.blogspot.co.uk/  - Christmas in March

Christmas Wreath

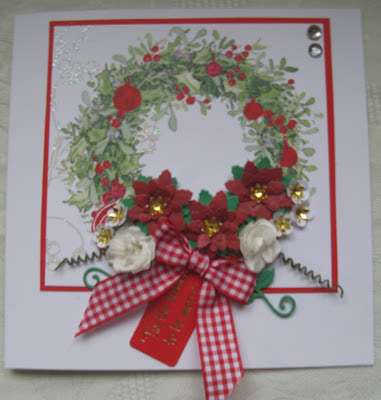
I just loved the bright red accents on the original image of the Christmas wreath on the card when I came across it in the recycling pile.


I cut the image to a square and mounted it onto bright red card to pick out the accents then added bright red Poinsettia flowers die cut from an old envelope and scraps of bright green and gold card. I added a couple of white paper roses from my stash and some Christmas roses made by peeling some mulberry blossoms apart and adding die cut gold centres to the individual petal layers.  the wire spirals are the stems cut from the roses and wound round the metal shaft of one of my embossing tools. The finishing touch was the bright gingham ribbon and the sentiment tag which reads 'tis the season to be Merry.

I am entering this card into the following challenges

http://crimbo-crackers.blogspot.co.uk/ - No stamped images
http://craftyhazelnutschristmaschallenge.blogspot.co.uk/ - Merry and Bright
http://craftyhazelnutschristmaschallenge2.blogspot.co.uk/ - Anything goes so long as it's Christmas
http://trimmiescraftchallenge.blogspot.co.uk/ _ Christmas in March

Merry and Bright

The theme at Crafty Hazelnuts Christmas Challenge this week is Merry and/ or Bright. Now for me there is one image of Christmas that never fails to make me feel Merry and Bright and that is a little robin red breast. I have a pair in my garden, we think they have a nest somewhere in one of big shrubs but haven't worked out which one yet. But even on the dullest and coldest winter days their antics in the garden never fail to make me smile. So in homage to my robins here is a card for this weeks challenge.


 The image and greeting is recycled as part of the charity project and the ribbons are from my stash as are the little gold beads. The flowers were die cut from the pages of an old book and then coloured with barn door distress ink. I added the gold card for a bit of bling.

I am entering this into the following challenges
http://crimbo-crackers.blogspot.co.uk/ - No stamped images
http://craftyhazelnutschristmaschallenge.blogspot.co.uk/ - Merry and Bright
http://craftyhazelnutschristmaschallenge2.blogspot.co.uk/ - Anything goes so long as it's Christmas
http://trimmiescraftchallenge.blogspot.co.uk/ - Christmas in March

Friday 15 March 2013

Floral Fantasies Competition

In one of the comments on my recent designs Brenda told me she was running a competition on her blog to celebrate her 4th blog birthday and soon to be 4000 followers.

I popped over to take a look and to enter I became a follower, left a comment and designed a card, and added a link on my side bar to the competition.

The brief was to design a card that was inspired by Brenda's blog. It could be anything from the blog or even a cased card from one of Brenda's designs. So here is my effort


As soon as I saw her blog the obvious things was poppies - as you can see in the link. So after a quick search  I found this beautiful digi stamp at http://www.mcmahonfivedesign.com designed and drawn by Sue McMahon. I coloured it using Spectrum Noir alcohol markers.

Now I could have just left it there but I decided to delve a bit deeper into Brenda's blog to search for more inspiration. Discovering she was on several Design Teams including the one for Pretty Little Ribbons decided me on the addition of the gingham ribbon.

I noticed that Brenda also uses the Marianne frame dies in her crafting I wanted to reflect this but rather than use the same frame die I cut 3 slats using one of the new release fan dies from Marianne. 

A number of Brenda's cards have a lovely vintage feel to them so I found the lovely Polka dot papers at Jeka  heath designs and printed them using draft quality print tone the colour down and give them a more vintage feel. I aged them further by roughing the edges and using Ranger Distress ink around the edges.

In the published work section of her blog Brenda talks about the massive thrill she got when she discovered her designs were sharing a double page spread with the master himself none other than Tim Holtz. I could totally relate to her excitement as I am a huge fan of Tims work - my husband even refers to him as my other man. So to add a little Tim to the design I used Kraft card as the base and added the hope dream and wish tags from his ideology range.

I then went back to the header image on the blog and added more poppies from Wild Orchid crafts and three tiny punched poppies that I cut from some off cuts of red paper. I also added a die cut butterfly cut from black card using a crafty individuals die. I glittered the butterfly's body and the centres of the poppies on the digi stamp using black stickles just to give a subtle touch of sparkle.


Inside the card was decorated using images from the Ooh La La CD 'Carnival of Colour' and I added another strip of ribbon for good measure, to decorate the pocket for the bookmark. 


The final touch was the blank panel for the greeting and three tiny punched poppies and a butterfly.

All that remains for me to say is Happy Blog Birthday Brenda and here's to reaching your 4000th follower very soon only another 118 to go at the time of writing.

I am entering this card into the following challenge

http://stamping-fantasies.blogspot.co.uk/2013/03/a-special-celebration-with-prizes.html


Egyptian Beauty

The challenge at CD Sunday is Land of the Pharaohs - this presented a bit bigger challenge than usual because I knew I had nothing remotely Egyptian in my CD or paper stash.

I found a lovely digi stamp on line at The Paper Shelter and downloaded the file which came with a pre coloured image as well as the outline stamp. Being a bit short on time I used the pre coloured image in this design.


I decided that I needed lots of gold and Jewels on the design and printed the gold leaf effect paper from the Magical Mystical Metallics CD from My craft studio. I used another backing paper from The Paper Shelter with the hieroglyphics and the border on. I happened to have some scraps of Gold card and deep blue glitter card lying next to each other on my craft table and together the two reminded me of the incredible death mask of the Boy King, which I was lucky enough to see as a child when it was exhibited at the British Museum. I layered the scraps up and die cut the top border and  then used the same die to trim the remaining piece of card into an hour glass shape which was then cut across the middle to form the two vases.

I am entering this card into the following challenges
http://cdsundaychallenge.blogspot.co.uk/ - Land of the Pharaohs

Santa Book

Having had another sort through the recycling bag I came across a card with this image on the front.


I cut around the book on the front of the card and then scored along the page lines and the spine of the book using a score board. The book was then gently curved using the edge of my craft table before being added to the front of a really simple easel card. Really simple but effective.

I added the Poinsettia as a stopper and used pearlised paint to add the pearls on the edges of the pages.

I am entering this into the following challenges


http://craftyhazelnutschristmaschallenge.blogspot.co.uk/ - Santa and/or his helpers
http://craftyhazelnutschristmaschallenge2.blogspot.co.uk/ -anything goes so long as it's Christmas

Wednesday 13 March 2013

Traditional Santa

So many of the cards in the recycling project depicted Santa that it was difficult to know where to start when choosing one to create a card for CraftyHazelnuts Christmas Challenge blog this week. However when I came across this image I just knew he would lend himself to a bit of vintage styling.


I used Kraft card as a base because I feel that this grabs the vintage look immediately, apart from the ribbon and the greeting tag everything else is from the bits box and is left over from previous projects. The paper lace frame is the first one I ever cut with the Anja Oval die from Marianne and I ripped the bottom part getting it out of the die. I managed to cover the rip with the layers of paper and the image. The felt stocking was something else from the recycling bag and I added the die cut flowers which were all cut from scraps of paper and card. They are a bit fiddly to cut especially the centres but I am really pleased with the way they have turned out. I make them up in batches and just use them as I need them now.

So I will leave Santa checking his list to see who has been naughty or nice and enter this card into the following challenges.

http://craftyhazelnutschristmaschallenge.blogspot.co.uk/ - Santa and/or his helpers
http://craftyhazelnutschristmaschallenge2.blogspot.co.uk/ -anything goes so long as it's Christmas

Sunday 10 March 2013

Blue Christmas

I have always been a bit of a traditionalist when it comes to Christmas cards but with so many to recycle I am becoming more of a fan with regard to contemporary designs and colours.

This is one of the recent cards I cam up with in response to the bingo challenge at ABC Christmas Challenges I chose Glitter, Blue and Ribbon as my three design elements.


I found this contemporary image and mounted it onto a lovely ice blue glitter paper that was part of a prize I won for being chosen as the star letter in Papercraft Inspirations magazine in the February issue, I added a Bow that had been made from several off cuts of blue organza ribbon and secured this with a brad and mounted it onto white gauze and fixed it to a length of ribbon wrapped round the glitter paper.

I am entering this into the following challenge
http://abcchristmaschallenge.blogspot.co.uk/ - Bingo Glitter Blue and Ribbon

Santa's Little Helpers

Well actually not so little, I guess that the biggest help that Santa gets during the festive season is from his team of reindeer because he'd never manage to get to everyne on foot. So when sorting through my recycling bag I came across these two cards they just cried out to be recycled into a pair of matching cards.


I added some glitter to the hats and coats and tied gingham bows round the gold backing card to balance the designs.

As Crafty Hazelnut is featuring Santa and/or his helpers this week I decided to enter them into her challenge and also into her challenge for March where anything goes as long as it's Christmas.

http://craftyhazelnutschristmaschallenge.blogspot.co.uk/ - Santa and/or his helpers
http://craftyhazelnutschristmaschallenge2.blogspot.co.uk/ -anything goes so long as it's Christmas

Blog Candy at cards for all occasions

If you look to the right you'll see the candy on offer at Crafty Kitten's blog Cards for All Occasions. It's simple to enter post about the Candy on your own blog then become a follower of Cards for All Occasions and add the link your blog post about the candy using the linky tool here http://cherrytreestudio.blogspot.co.uk/

Whilst you're there have a look round at the gorgeous designs that Crafty Kitten has posted on her blog it's well worth the visit.

Good Luck


Thursday 7 March 2013

Dramatic black and gold.


Black and gold is one f my favourite colour combinations, so when I saw this image in my Christmas card charity recycling bag I couldn't resist using it in a fairly simple design to make the most of the image.


I matted the image onto gold mirror card then mat black paper and another layer of gold mirror card. I wrapped teh panel with gold satin edged organza ribbon (yes another one of my bargain buys) I took a sentiment from another card and matted that onto black then gold and stuck it on at an angle to add a bit of interest. I mounted the panel onto an A5 card blank and then added the ribbon and the two die cut snowflakes to finish.

I am entering this into the following challenges.

http://craftyhazelnutschristmaschallenge.blogspot.co.uk/- ribbons
http://craftyhazelnutschristmaschallenge2.blogspot.co.uk/ - Anything goes so long as it's Christmas
http://christmascardchallenges.blogspot.co.uk/ - Anything goes

Snowflake wreath


I made this last night and then heard the weather forecast saying we may get more snow by the end of the week. I hope I haven't tempted fate.


The snowflake wreath was an embellishment I found on one of the Christmas cards I was recycling the original design just had it on a silver background and it looked a bit lost. 

I managed to remove it from it's original backing but damaged one of the snowflakes in the process, as it is quite delicate. I decided  that it would look perfect on this bright blue glitter card from my stash as I had a piece left over from making an an Art Deco card for my sister-in-laws birthday. 

I wrapped the ribbon on the wreath over the top of the glitter card and decided that the wreath looked more effective off centred. To balance the card I wrapped a lovely satin edged organza ribbon I had picked up from a haberdashery store near my dad's earlier this week. It was in their bargain bundle bin and works out at around 10p a metre. I bought it with a view to using it on Wedding cards but it worked really well on here. 

I then matted the panel on silver mirror card before adding to a 6x6 card blank. 

To cover the damaged snowflake I added one cut from silver mirror card and glittered with stickles. I added another die cut snowflake to the ribbon bow and the sentiment is recycled from a pre-loved card.

 I finished off with little flat backed glitter pearls and the silver wire twists. The wire twists are actually cut from one of those stainless steel pan scourers I picked up a pack of 4 for 49p in a local bargain store and they will last me for years to come but they add a finishing touch to the card. 

I am entering this card into the following challenges

http://abcchristmaschallenge.blogspot.co.uk/  bingo challenge I chose glitter, blue and ribbon

http://craftyhazelnutschristmaschallenge.blogspot.co.uk/- ribbons
http://craftyhazelnutschristmaschallenge2.blogspot.co.uk/ - Anything goes so long as it's Christmas
http://christmascardchallenges.blogspot.co.uk/ - Anything goes

Ribbon Bonanza

When visiting my dad this week, I got a chance to visit a new shop that has opened up in his village. It has a fabulous haberdashery department and had a section for ribbons they were selling off at discount prices, I couldn't resist and bought several bundles which when I got them home and measured them work out at less than 10p per metre. Whilst there I also found a lovely black and white polka dot ribbon ruffled on to fine net and although more expensive I couldn't resist buying a length to add to my stash.

As soon as I got it home I had to create something with it and knew the perfect design on the Ooh La La shoes in bloom CD that would work with it.


Other than the Ooh La La topper and matching papers, the sentiment and the faux button were also from the same CD. The topper is from the folder 'Dance Petticoat. I added the floral embellishments, feathers and string of pearls, and finished the front of the card off by adding the little net butterfly. The Pearls were also from the haberdashers. The flowers are from Wild Orchid and the feathers and butterfly have been in my stash box for a couple of years.

I kept the girly theme by using pink card stock as a background that had been mounted on silver mirror card and all the papers and the toper were also matted on the silver mirror card to bring the design together. I created the panel and wrapped the edge with the ruffled polka dot ribbon and net before adding it to 8x8 card blank.


 Inside the card I used the DL insert from the CD which I shrank down to 6x6 and then mounted on silver mirror card to give a glamorous feel to the inside. 

The right hand side had a die cut butterfly added and I trimmed the opposite corners with white pearlised card candi.


On the left hand side I made a pocket from another topper from the CD and added a bookmark again from the CD that had been threaded with black and white polka dot ribbon which is reversible - another of my haberdashery bargain buys.

I have loads of other ribbons to play with and I think I can safely say they will be appearing on my cards in abundance over the next few weeks.

I am really pleased with the design and I will be sending it to a very special friend for her birthday. I know she'll love it and she will make good use of the bookmark as she is an avid reader.

I am entering this card into the following challenges

http://oldiebutagoodiechallenge.blogspot.co.uk/ - Feeling Floral ( my something old feathers and butterfly) 

New dies

Having been away for a couple of days I arrived home yesterday afternoon to find an envelope from crafts u love waiting on the door mat for me. I knew exactly what was inside and - I had pre ordered one of the new Marianne fan dies a couple of weeks ago and I couldn't wait to have a play.


I cut six of the lacy panels from white card and then backed these with red card cut with the plain panel die in the pack. The little robins were taken from a set of gift tags in my Christmas card recycling bag. They had the robins on the branch added over the top of a flat image of the robins. I carefully peeled off the toppers to leave the image underneath and cut 6 of these using the die as a template to get the right size. I then arranged the fan slats and used a pretty pearl brad to fasten them together at the bottom. spread them out and then stuck them in the open position onto a card stand. I then added the robin toppers that I had previously removed from the gift tags to 3 of the panels and added a ribbon bow tied from bright scarlet ribbon to the end panel and a greeting fussy cut from another card in the recycling bag across the middle. I am really pleased with the effect and can see me making a lot of fan shaped cards in the future. I have some Victorian style decoupage scraps in my stash and I have a feeling these will work really well with the shape, plus because they are on quite thin paper it will enable me to make a working fan, which will open and close.

I am entering this card into the following challenges.

http://abcchristmaschallenge.blogspot.co.uk/  bingo challenge I chose not square, pearls (the brad) and ribbons

http://craftyhazelnutschristmaschallenge.blogspot.co.uk/- ribbons
http://craftyhazelnutschristmaschallenge2.blogspot.co.uk/ - Anything goes so long as it's Christmas
http://christmascardchallenges.blogspot.co.uk/ - Anything goes

Monday 4 March 2013

Four legged friends Ooh La La Creations DT card

Well hello another Monday and another challenge from Ooh La La Creations . Once again last week we had some fabulous entries in or Sparkle and Shine Challenge and you can see the winners over at the challenge blog here. We also had a call for Guest Designers and Dawn is busy reviewing all the entries.

This time our theme is four legged friends and I have chosen to use a delightful image from the Yesterday's Memories CD. This was a sell out when it was launched on Create and Craft recently but you can order your copy direct from http://www.ooh-la-la-creations.com/Pages/default.aspx


I'm not usually into cats but I fell in love with this image the moment I saw it. I actually worked to a sketch from a magazine to create the card. The papers and image are all from the same CD and just added the doily the ribbon, buttons and sentiment. 

One of the things I really love about Wendi and Emma's designs at Ooh La La is all the little extra elements that come with each design set on the CD inside the card I used their beautiful post cards and stamp elements with the paler of the backing papers used on the card front to add interest once the card was opened.


On the left hand side of the card I just added three of the postcards and on the right hand side I added a panel to write a message and then used the postcard and one of the stamps to embellish this.


 I am entering this card in the following challenges

http://craftyourpassionchallenges.blogspot.co.uk/ That's odd use an odd number of embellishments
http://ppp-makeitmonday.blogspot.co.uk/ - Anything goes linky party
http://crazychallenge.blogspot.co.uk/ - Thank you card

Welcome to the World Brandan James

At 14:30 hours on 3rd of March 2013 hours My lovely stepdaughter presented her dad and I with our 4th grand child. Weighing in at either six pounds seven ounces or six pounds nine ounces (granddad took the call to tell us and was so excited he can't actually remember which). Both Mum and Baby are doing well and are now back home.

I of course had to make a special card and here it is


All the papers are from Ooh La La Creations CDs as is the bunting and the two little ticket tags. I cut the paper into panels and backed them with silver mirror card before layering up. I added lots of different textures with ribbons, scraps of fabric and by glittering the stork with stickles. Card candi, faux pearls and vintage buttons added the finishing touches.
Below are some close ups of the design elements on the front of the card 


Inside the card I again used papers from Ooh La La Creations CD's 


The little 'ribbons' on the bunting on the inside are also from the Ooh La La everyday occasions CD and it took me ages to cut them all out.


 The greetings strip was mounted on silver mirror card which was edged using a Martha Stewart Punch.


All that remains to be added is our message on the die cut circle.

I am entering this card in the  following challenges
http://craftyourpassionchallenges.blogspot.co.uk/ - banners
http://cinspirations.blogspot.co.uk/ - buttons and bows
http://fabnfunkychallenges.blogspot.co.uk/ - Pastel Colours
http://pennyschallenges.blogspot.co.uk/ use your favourite colour - blue
http://craftuscrazy.blogspot.co.uk/ Anything goes
http://ppp-makeitmonday.blogspot.co.uk/ - Anything goes linky party