About Me

My photo
Liverpool, Liverpool, United Kingdom
I have been crafting since May 2008, when in desperation to find an unusual birthday card for my Mum, I gave up looking in the shops and decided to have a go at making my own. I soon realised that crafting is addictive and I haven't brought a card since. In 2011 I completed my certificate in papercrafting as a result of the work I did as part of the course I started entering challenges on line and in magazines. I applied for design teams and also started making samples for Ooh La La Creations for their shows on Create and Craft. I have now completed my Diploma in professional crafting and most recently been runner up in the Papercrafter of the Year 2013 a competition run by Papercraft essentials magazine, I don't have a particular style I like to use elements from lots of styles and techniques, although I do love all things vintage. In 2014 I started to move more towards scrapbooking to take care of the huge family archive of photographs that were stored in my attic. I have continued cardmaking and Scrapbooking through 2015 and 2016 but have also become interested in off the page projects. I hope to be able focus on these in the future.

Monday 10 December 2012

Reflections Ooh La La DT inspiration

Hello again, well another Monday and this is the final inspiration card for 2012 as we launch the final challenge of the year at Ooh La La Creations.

Thanks to everyone who entered our previous challenge Spots and Dots, you can see the winners over on the Ooh La La Creations Challenge blog. Also thank you to all those who have participated in the various Challenges throughout the year and to my fellow DT members you have been a joy to work with and I am looking forward to working with you all during 2013.

Finally huge thanks to Wendi and Emma the owners of Ooh La La Creations for bringing us some wonderful CD's in 2012 long may it continue the images and papers are a true inspiration. If you are new to Ooh La La products take a look at the website to see all the CD's in the range and further inspiration in the gallery, by clicking on this link  http://www.ooh-la-la-creations.com/Pages/default.aspx.

Now onto my DT offering for this challenge


I decided that I wanted to create a double easel card and have used Kraft card as a base to keep the colour scheme of the beautiful image from the 'Watercolour Memories' CD the images are little works of art and when I saw this one I knew I had to use it (I have always had a passion for photographs and paintings of bridges reflected in water below).


Whilst looking for a suitable tag for the right hand side of the easel I found the text I eventually used in the tags and sentiments folder on the CD I felt the text captured the reflective nature of the card I wanted to create perfectly.


Unfortunately the image behind it didn't work with this gorgeous bridge so I used My Craft Studio and edited the image by reducing the opacity to 50% and then adding the text on top. I also did the same for the thinking of you tag on the left of the card but I only used a portion of the image this time to get the desired shape.

I printed off the tag the topper and the pyramage design onto white card. The pyramage is lovely to work with as it is so easy to cut out and line up. I used thin foam tape behind each layer as I didn't want too much height to the image. Once done the whole design was mounted on gold mirror card and trimmed to leave a fine gold edge I did the same with the topper and the tag.

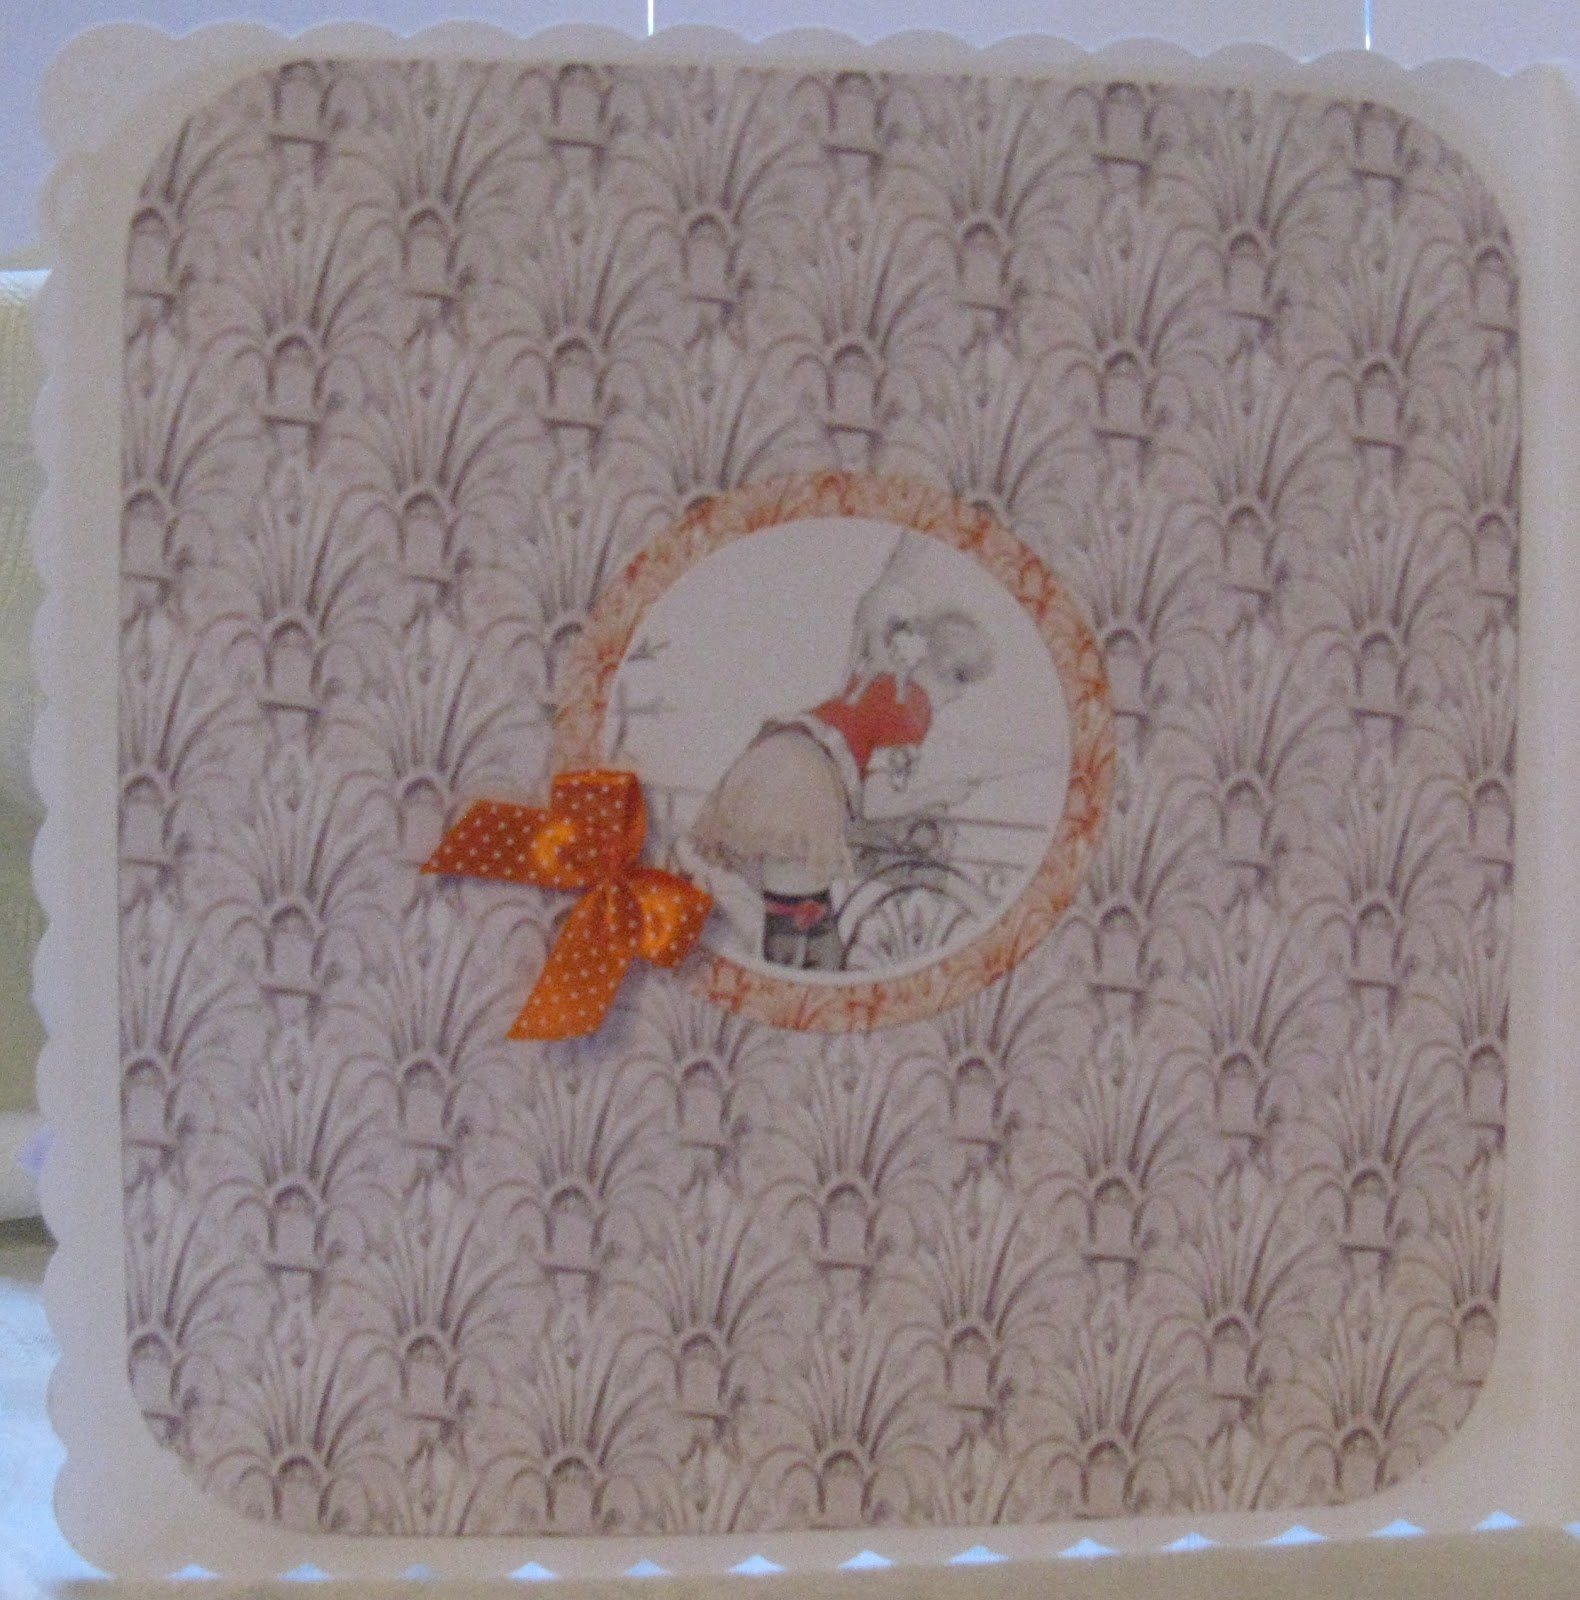
I made the easel by cutting the front of a 8" square kraft card into two section the larger is 5" and the smaller is 3" I then folded the 5" square to make the larger easel and used a pale beige paper that has a slight quilted effect in the design and I emphasised this by scoring along the lines and adding card candi at the intersections. I then mounted the paper onto gold mirror card and trimmed it to leave a narrow edge. having made 2 panels


I covered both the front and the back of the easel so that the back wasn't just bare kraft card.  I then cut the pieces of paper for the smaller easel and mounted these onto gold mirror card trimming to leave a narrow border and mounted then onto the front and rear of the smaller easel. The text topper was then stuck to the smaller easel and a die cut flourish added to the top and bottom right hand corner. these were cut in white card and coloured using ranger distress ink in aged mahogany to match the colour in the backing paper.

The Pyramage panel was then stuck at an angle to the larger easel and the tag had a copper eyelet and copper organza ribbon added and was stuck at an angle at the bottom left of the easel.

The inside of the card was lined using a matching backing paper from the CD and two strips of a contrasting paper was edged using a Martha Stewart punch. The stopper is made from die cut flowers and leaves which again were cut from white card which has then been coloured using aged mahogany distress ink to match in with the colour scheme.

All that remains is for me to wish you all a wonderful Christmas and I hope to see you all in the New Year.

I am submitting this card for assessment for my Diploma in professional crafting and will also be entering it into the following challenges.

http://ppp-makeitmonday.blogspot.co.uk/ - Anything Goes
http://simplycreatechallenges.blogspot.co.uk/ Anything Goes
http://pennyschallenges.blogspot.co.uk/ Anything Goes

Friday 7 December 2012

Almost There.

Well I reached the point where I have only two more Christmas cards left to make. Having made approximately 100 cards this year, I left two really special ones until last. The one for my Dad and the one for my Husband.

Now Dad is a somewhat of a traditionalist when it comes to Christmas - lots of red, gold and green, suits him fine so I came up with this.


I used a digistamp from crafty sentiments and coloured it with Spectrum Noir pens, adding glitter to the white  top and the tassels, and a layer of glossy accents to the candy cane. Once it was dry I fussy cut around the edge. The background card was a deep red and I trimmed it to fit my card blank and then edged it using peel off border stickers. I used the largest of my x-cut nesting label dies and cut the panel from the striped paper and then mounted this onto glittered green paper and trimmed to leave a narrow border. I then used the third largest oval from my xcut nesting dies to cut an oval from the green dotty paper and mounted this on the striped panel and stuck the panel to the card front. I used an x-cut alphabet die to cut the letters and stuck these below the panel. The stoking shape was then stuck to the oval panel using pinflair glue gel to give it a bit of dimension and I finished off the front with the holly sprigs made by snipping down 4 holly flourish shapes cut using a Cheery Lynn die.


I printed an insert for the inside and there you have it my Dad's card.

Now all I have to do is design and print the insert for my Husband's card which is currently drying in a hidden location so he doesn't see it, and then all the Christmas bits and pieces can be packed back in their drawer until I start on the next batch of Christmas cards - usually around January to use up all the recycled tags and cards from this years festivities.

I am entering this card into the following Challenges
http://littlescrappieces.blogspot.co.uk/ - It's beginning to look a lot like Christmas
http://trimmiescraftchallenge.blogspot.co.uk/ - Christmas
http://cutecardthursday.blogspot.co.uk/ -red and green
http://pennyschallenges.blogspot.co.uk/ - Anything Goes


Monday 3 December 2012

Pastel Christmas

Having three grandchildren of similar ages it is always a challenge to create their Christmas cards every year. They have to be different enough for them to feel that each card is specially for them, but similar enough to prevent any falling out. This year I decided that they are old enough to move away from pictures of Santa, which have formed the basis of their cards for the past couple of years, so I went with stockings.

I don't do much colouring but am trying to get to grips with my Spectrum Noir markers, so I used a digi stamp from Crafty Sentiments. It was sent to me last year when I took part in a blog hop at Craft Your Passion, it is a simple design but looks really effective. I also decided to go with a pastel palette for a change.  Here are the three cards I came up with


By using different papers from my stash I was able to create three designs.


 I went with lovely girlie pink for Chloe-Ann our granddaughter. I am entering this card into the following challenges.


Damien and Aaron got green and blue respectively. I added two tiny 'jingle bells' to each card on top of a snowflake glittered the appropriate colour using stickles glue and then added snowflakes which had been coated with iridescent stickles. I also added a thin layer of glossy accents too the candy canes to give then a shiny finish.

Finally I printed matching inserts for each card and added a die cut greeting panel with their names on.
I am entering the boys cards into the following challenges.
http://2sisterschallengeblog.blogspot.co.uk- Christmas sparkle - lots of stickles
http://pileitonchallenge.blogspot.co.uk/ = pile on the embellishments, ribbons bells and snowflakes
http://cutecardthursday.blogspot.co.uk/ - snowflakes
http://simplycreatechallenges.blogspot.co.uk/ - Anything goes
http://ppp-makeitmonday.blogspot.co.uk/ -Anything goes
http://incywincydesigns.blogspot.co.uk/ - Non traditional Christmas colours

Monday 26 November 2012

Spots and Dots Ooh La La DT Inspiration

Good morning all, thanks to everyone who entered the Someone Special Challenge last time we had some beautiful entries the winners and the new Spots and Dots Challenge can be found on the Ooh La La Creations Challenge blog.

After my lavish mini book last time I have decided to keep it simple this time to show how easy it is to create a stunning card using the Ooh La La CD's for my project this time I used the 'Shoes in Bloom 2' CD and selected the design folder dance petticoat and posy. I also used some embellishments from the CD. I dipped into a another CD as well to complete the design but I'll explain as I go along. So here is the card.


As soon as I saw the challenge I knew I wanted to use this image as the main focus of the deign. I love pink and black together and the delicate spotted petticoat with the pretty pink roses is gorgeous. The topper the matching backing panel and the matching buttons were all printed onto white card and cut out. In addition I printed the contrasting backing from the bonus paper folder on the 'Shoes in Bloom 2' CD onto a sheet of white A4 paper. The black and white polka dot paper was from my stash and the pink polka dot ribbon was from the 'Everyday Occasions' CD. I cut the main backing paper into a square to fit an 8" square card blank and wrapped the pink 'ribbon' round the left hand edge securing the ends at the back. I also trimmed the bottom with a strip of the black and white polka dot paper which had been punched along one edge using a Martha Stewart lace edge punch. Once the edgings had been added I stuck the baking paper to the card blank. I then added the black and pink dotty panel and trimmed this with silver peel off edging strips. I then layered a paper doily onto this and layered a circle of the black and white polka dot paper to the centre and edged this with a peel off edging strip. I chose a doily that has a rose bud design in the edging to imitate the elements of the design on the topper. I added the topper which had been trimmed to leave a fine white line around the edge. The three faux buttons were threaded with fine pink ribbon and stuck to the top of the card. The pink polka dot paper bow was added before the sentiment one I happened to have in my stash and the pearls added to complete the design. 


To complete the card I printed off the DL insert from the CD and used this on the inside right of the card with the addition of pink polka dot card candi. 

The left hand side was completed by trimming one of the backing papers from the folder on the CD to a square and then adding a doily, into teh centre of this I stuck a smaller version of the image which had been cut into a circle, the edge of the doily was then trimmed with card candi.


I a submitting this card as one of my assessment pieces for my Diploma in Professional crafting as well as entering it into the following challenges.

http://fabnfunkychallenges.blogspot.co.uk - Birthdays and 3 I used 3 faux buttons on the front of the card
http://ppp-makeitmonday.blogspot.co.uk/ -Anything Goes
http://inkyimpressionschallenges.blogspot.co.uk - Make it Girly
http://thepapershelter.blogspot.co.uk/ - Birthdays
http://movingalongwiththetimes.blogspot.co.uk/ Lets go Dotty
http://littlescrappieces.blogspot.co.uk/ - Fun Black Friday Challenge
http://joannasheenchallenge.blogspot.co.uk/ Anything goes except Christmas
http://cupcakecraftchallenges.blogspot.co.uk/ Black and white plus one

Wednesday 14 November 2012

A Little bit of Ooh La La

 I found out on Monday that I had passed my Diploma in Professional Crafting, as part of the work I have done towards it I used a lot of the DT work I do for the Ooh La La Creations Challenge blog and have had huge support from the owners of Ooh La La whilst I have been completing projects for the Diploma. Now I am not frantically typing up evidence for the Diploma I have a bit more time on my hands and as such when Wendi at Ooh La La sent me a sneak preview of some of the images that she was thinking of including on the new CD she is working  on I couldn't wait to get started making cards with them. So here is a sneak preview of the what you can expect on the new CD as always beautifully drawn images and co-ordinating backing papers. You will be able to purchase it from the Ooh La La Creations website once it is ready.


This image is called 'Saucy with Cat' it comes in full colour as well as this version with only the clothing coloured. As soon as I saw it it immediately made me thing of Paris and the 1930's and as such it was perfect for a birthday card for a friend of mine.


I used backing papers that will be part of the collection on the CD and as all the papers are not yet finished (I told you this was a sneak preview) I also supplemented these with some papers from the All Dressed Up CD. The papers from the All Dressed up CD were cut with a Tim Holtz tattered flowers die and layered up with and given the stickles treatment. I also added a grey organza ribbon bow and an Eiffel Tower charm that I spotted on a necklace in a charity shop yesterday whilst out shopping.

the charm reflects the die cut Eiffel Tower that I added to the card. This was cut using a Marianne designable die. I also added die cut leaves and flourishes. The tower and the leaves were coloured black and then given two coats of black nail polish to give them a sheen. The flourishes were dipped in black glitter. I also added two jewelled pins the beads again being rescued from a charity shop necklace.

The pins are really easy to make, I just put a thin coat of glossy accents on the pin before pushing the beads up and it holds the beads in place.


The sentiment panels were just printed out on the computer and to keep with the French theme I used 'gigi' font. I then just cut these out and mounted them on backing paper trimming to leave a thin border.


The inside of the card was lined with another of the backing papers from the new CD  


 On the left had panel I added a die cut circle of the main image with a little polka dot bow.


On the right hand panel I added another of the die cut flowers and two of the small toppers from the new CD.


 I am entering the card in the following challenges.
http://craftycatzweeklychallenge.blogspot.co.uk/ Anything goes
http://ppp-makeitmonday.blogspot.co.uk/ Linky Party - Anything Goes 

Monday 12 November 2012

Someone Special OLL DT

Good Morning everyone, firstly as always thank you to everyone who took part in our C is for Christmas Challenge last time. Go and check out the worthy winners at the Ooh La La Creations Challenge blog. We had some fabulous entries again this time.

Our Challenge this time is Someone Special and I have decided to share something special I have made for someone very special. My step-daughter is expecting her fourth baby in March and being extremely organised she not only knows that the new arrival will be a little boy but also what she is going to call him. I decided to make her something different from a card to welcome the little fella into the world and I knew that the gorgeous artwork of Shelly Rasche was perfect for a keepsake mini book ready prepared with captions for my step daughter to add the first pictures of the new arrival when the time comes. It just goes to show that although Ooh La La CDs are associated with card making you can use these gorgeous designs to do so much more. So here is my Mini Book created using papers and images from the Ooh La La Everyday Occasions CD, you can purchase the CD direct from the Ooh La La website here . I have also made a box to house the book and decorated this with a topper from the CD.


I started by making a plain white box and lid from two A4 sheets of card and using the Glitter Girls box maker board. Once the box was constructed and ready to decorate. I added a sheet of pearlised paper to the lid and gathered white gauze to form a loose rosette this was stuck to the centre of the box. I trimmed the sides of the box with broad lace threaded with ribbon and added card candi along the length. I then split a length of the lace without the ribbon in half lengthways and used it to trim the topper from the our baby topper from the CD.which I stuck over the gauze rosette at an angle. I added two die cut corners made using the Anja Corner die from Marianne creatables and added card candi to the top.

I trimmed a piece of backing paper from the CD with lace and used this to line the bottom of the box.


Having completed the box I worked on the inside pages for the mini book. I used a Papermania chipboard mini album as the base.


I kept with the Our baby folder for the first two pages covering them in papers from this folder and printing off the bookmark from the CD that matched the design for details of the new arrival to be added.


I also added an image of the lamb from the centre of the topper design to the left hand page and I made a frame from a die cut and embossed rectangle and acetate which was added on the right hand page for the first photograph. a length of ribbon and a bow were added to the bottom corner of the right hand page to match with the bookmark and added some card candi for good measure.


The next two pages are dedicated to the new arrival meeting his siblings - I wanted to include the three grandchildren I already have in the book, as I want them to feel that they they are included in the excitement of the new arrival. I used papers from the Baby Bears folder on these two pages and added another frame for a picture of the new boy with his two brothers and sister on the left hand page.


The right hand page has a journalling card made from one of the mini cards on the CD by editing he design in MCS to remove the main image and leave the frame and the journalling was added using safmat and printed on the computer - I really don't like my handwriting so use a calligraphy font for journalling.I also added a lace trim and the bunting was from the embellishments folder on the CD.

For the next pages I decided on the lovely image and papers from the bear on a lamb rocker folder. The backing papers have a lovely sunny feel to them, hence the caption 'Our little ray of sunshine' I made a small pocket for the left hand page with a tag that slips out for details of when and where the photograph that is displayed on the page opposite is taken.


The right hand page continues the sunny theme and has had a frame added ready for a photograph to be inserted.

I am a firm believer that any baby book should contain at least one photograph that the proud parents can use in years to come to embarrass their off spring so the next two pages are designed for this purpose and revolve around bath time. The left hand page is the only interior page of the book which does not feature backing paper from the Everyday Occasions - this bubble paper is from the Kidiwinks CD. I added a die cut and a caption and then used 3 duck buttons from my stash as embellishments. After all bath time wouldn't be complete without plastic ducks in the bath now would it?


For the right hand page I used a lightly marbled paper from the Everyday Occasions CD and  again added a frame for a photograph to be added.


The final inside pages revolve around bed time and the left hand page has a simple plaid paper and frame for a photograph.
 The right hand page has a lovely swirly paper and the image I have used to create a pocket is cut from a backing paper from the Kidiwinks CD - and it just put me in mind of a nursery. I added a tag with a pretty blue gingham ribbon to reflect the plaid design on the opposite page. I have added Journalling which is pictured below. I also trimmed the edge of the page with left over lace from the box construction this time threaded with pale blue ribbon and with card candi added to reflect teh design on the side of the box lid.


Having completed the inside pages I chose to use white work for the front and back covers of the book. Teh front is a pearlised paper stuck to the front cover and an embossed and die cut panel made using a Marianne  designables folder has been trimmed with white lace and stuck over the top. I have added a die cut pram which was made using a Marianne die and white card and this has then had glitter highlights added using stickles iridescent glitter. Pearls have been added to the centre of the wheels the end of the pram handle and what would be the hinge of the hood. Finally a line of pearls have been stuck to the opening edge of the panel and a punched butterfly (my step-daughter has a thing about butterflies) and a pure white satin ribbon add the finishing touches.


I tied lots of ribbon bows around the rings which hold the pages together and added three charms a pram, a baby's bottle and a nappy pin. finally a tag has been added welcoming the new arrival. This has been threaded on ribbon and a bow tied in one end and stuck to the top left hand corner so that it can lie on top of the book when it is in it's box.


The back cover was made by trimming a piece of white card with lace and sticking this to the back panel and then adding a die cut with the message from my husband and I (you will notice it says Big Al, this is for the benefit of our three other grandchildren who call me this in preference to grandma as they already have two grandmas and to have 3 would be confusing)


 I added an embossed panel of pearlised paper and the stork was actually one I bought from a local craft shop ages ago and had in my stash.

I hope my step-daughter likes it and I can't wait until the new bundle of joy arrives and I can have my first cuddle.

I will also be submitting this to the Craft Qualification Centre as one of the projects for assessment for the Diploma in Professional crafting I am in the process of completing.

As well as entering it into the following challenges.
http://allsortschallenge.blogspot.co.uk/ - Young at Heart
http://craftycatzweeklychallenge.blogspot.co.uk/ Anything Goes
http://ppp-makeitmonday.blogspot.co.uk/ - Anything Goes

Monday 29 October 2012

C is for Christmas - Ooh La La DT card

Good Morning, today sees the launch of the new fortnightly challenge at Ooh La La Creations ....... but before I show you my card for the Design Team this time, I just want to thank everyone who entered the last challenge Christmas Sentiments. As the DT member choosing the top 3 I had to have a lie down in a darkened room after making my choice. It really was a difficult job, but also very enjoyable and inspirational there were so many gorgeous entries. You can see the winners over on the challenge blog here. I hope the lucky winners enjoy their prizes.

Now onto the new challenge C is for Christmas, having received my copy of the new 'Yuletide Wishes' CD from Ooh La La Creations...don't forget to tune into create and craft at 5pm this afternoon to see it featured in the show with Hayley. It took me most of the day to decide which image to work with there are so many gorgeous images and papers on there. I kept coming back to Holly Angel and so here she is .........


I used Kraft card as the base and the main backing paper is from the bonus folder on the Yuletide Wishes CD. I printed the backing paper off onto white pearlised paper to give it a lovely sheen and I cut a square from it which I then mounted onto matte finished gold card and trimmed this to leave a narrow border. The graduated blue paper was from the Holly Angel folder and I cut a square from this and ran it through the big shot using a Kreasions - garden flourish folder to emboss it. Holly herself was printed onto white super smooth card and I printed two images. The first I mounted onto matte gold card and trimmed to leave a narrow border, and the second image I fussy cut taking off the wings and the lower hem of the skirt and mounted this on top of the main image to give a 3D effect.


The edges of her cloak were given the Flowersoft treatment using Polar white, her dress was given a thin coat of stickles iridescent glitter and finally I highlighted the wings using gold stickles. Whilst she was drying I went to work on several flourishes and leaves from my precut stash these were cut from white card but I coloured them using stamp it up metallic gold ink before coating them with stickles gold ice, the white poinsettia was also given the gold ice treatment.


The sentiment was a clear self adhesive one I had in my stash and I stuck it to an off cut of the main backing paper to match it into the design. I then added a double bow tied in a lovely coffee coloured lace which I had got recently for a few pence from a stall on our local market from their bargain bundles bin. The small cream and blue flowers were from my stash. The final touch was the blue pearls at the corner of the card.

I have got a bit carried away with the Christmas theme and decided to add two candles as a bit of set dressing for the main photo. They are covered in dark green flocking and as such are unsuitable to be lit and are for decoration only. I printed off the White Poinsettia decoupage from the Ooh La La 'Fleur d'Imagination' CD and added the decoupage panel to the candles to give them a bit of a Christmas make over. 

I will be entering the card in the following challenges

Saturday 20 October 2012

Bewitched

I don't usually go for the whole Halloween thing, due mainly to it not being something that has any roots in my childhood. However a few nights ago I was making a Christmas card and using some die cut corners which I had cut using a Cherry Lynn die, called holly corners. I was suddenly struck with an idea that if I turned the corners upside down and made a few well placed snips with scissors I could create a bat. This lead me to search my stash for suitable items to create a Halloween Card so I could use my bats and here is what I came up with.


 Materials used

8 inch square Kraft card base
Black card
Bright Orange Card
Image, backing paper and sentiment from the Ooh La La CD Femme Fatale in the ATC folder.
Black Lace, Black ribbon, Hessian strip, and Gold Organza ribbon from my stash
Flowers from Wild Orchid Crafts
Gems and beads from stash
Gold stamp it up pigment ink pad
Marianne dies LRO157 - Leaves and  LRO206 - Ivy Leaves
Kreasions die - Fern Leaves
Cherry Lynn die Holly Corner.
Black glitter from my stash.

Method.
I resized the image of the Witch from the ATC folder and cropped off the happy Halloween greeting down the side, I also resized the Happy Halloween sentiment. The backing paper was from the flights of fancy folder on the Femme Fatale CD and by opening it in my craft studio I was able to adjust the colour to fit this project. I printed 2 copies of the topper and 1 sentiment onto white card. If you haven't come across Ooh La La CDs before then you can find the full range here . They are really versatile and can be used stand alone or in a graphics programme as I have on this project and they contain some stunning images and backing papers.

To give the card some extra depth I fussy cut one image of the Witch from the topper and using scissors to gently curve the skirt I glued this over the image on the other topper using glue gel. I then added some spots of PVA using a microfine tip to her hat the hem of the dress and the corset area of the dress before sprinkling with ultrafine black glitter. This was left t one side to dry.

I then cut the Black card, orange card and backing paper to size to leave a thin border of the base card showing.

I roughed the edges of the backing paper and orange card and rubbed the edges along the gold ink pad before sticking the backing paper to the orange card. I then wrapped this panel with the Hessian strip and the black lace and ribbon sticking the ends at the back of the panel to ensure a neat finish and then sticking this panel to the black card panel before sticking the whole panel to the base card.

I die cut a selection of leaves using the dies listed above from black card. To allow the topper to dry fully I made up 2 jewel pins using a selection of beads from my stash, which have been collected from various charity shop buys of old jewellery. I used 2 long Jewellers pins with decorative flower finials and coated the pin in glue gel ( by sticking it into the end of the tube) and the slid the beads into place. I wiped the end of the pin which was left exposed and left these to dry.

I roughed the edge of the topper using scissors and rubbed this onto the gold stamp pad, I also did the same with sentiment. I stuck the topper onto the card using glue gel and added the flourishes either side, before adding the sentiment.


I tied a double bow in the organza ribbon and having played with the various leaves diecuts stuck the leave to the card with the bow over the top of the join. I then added the orange flowers and berries and whilst the glue gel I had used to hold the flowers and bow in place was still wet I pushed the jewelled pins in at an angle.


The bats were made by snipping off the centre of the three holly leaves and the flourish from the holly corners die cut. I also flattened the top edge of the remaining 2 leaves snipping off the holly points, These were then turned upside down and the orange gems added for eyes and a black crystal gem for the nose.


The final touch was a line of three of the orange pearls on the bottom corner of the sentiment.

I am entering this card into the following challenges
http://allsortschallenge.blogspot.co.uk/ - Use autumn colours - Orange and gold
http://anythingchallenge.blogspot.co.uk/ - make your own embellishments - the pins and the bats
http://audsentimentschallengeblog.blogspot.co.uk - Halloween
http://craftyourpassionchallenges.blogspot.co.uk/ Which,Witch is which?
http://craftycatzweeklychallenge.blogspot.co.uk/ Halloween
http://fabnfunkychallenges.blogspot.co.uk/ - Orange Black and Choice - my choice being the Brown of the Kraft card and Hessian
http://hookedoncraftchallenges.blogspot.co.uk/ Halloween
http://lilredwagon.blogspot.co.uk/ - Bowdelicious (include a bow in the design)
http://onestopcraftchallenge.blogspot.co.uk/ -Anything goes
http://pennyschallenges.blogspot.co.uk/ - Girls Girls Girls - well my Witch is definitely a girl

Monday 15 October 2012

Christmas Sentiment OLL DT

Hello everyone, well I hope you caught the launch of the new Ooh La La CD 'Yuletide Wishes' yesterday on Create and Craft. If not you can go to the Ooh La La website to browse the gallery to see some of the projects the DT have made using the CD. There are some gorgeous images on it once again drawn by Shelly Rasch so if you liked the 'Everyday Occasions' CD you will love this latest edition to the Ooh La La selection.

Our last challenge over at Ooh La La Creations Challenge blog was 'Santa' and there were some fabulous creations, thanks to everyone who submitted a card and you can see the winners on the blog. Congratulations to you all.

The next challenge is once again designed to keep you in the Christmas crafting mood and is 'Christmas Sentiment'. The prize for the winner of this particular challenge will be a copy of the new Christmas CD 'Yuletide Wishes'


I was originally going to use one of my samples that I had submitted for the Create and Craft show but I changed my mind when I came across a lovely bookmark on the 'Boys to Men' CD. Here is how I used it on my card......


I printed the bookmark onto white card and then scored and folded the card to give a double thickness I fastened a piece of organza ribbon between the layers to make it easier to remove the bookmark from teh pocket on the card.

I made the card blank by scoring and folding the front of a scalloped edged card blank in half to form the easel. I then cut the patterned paper to fit each of the front panel and matted them onto black card to leave a thin border and wrapped each one with organza ribbon, before sticking them on the front of the card.

The image for the pocket was also mounted on black card and trimmed to leave a thin border before being stuck on three sides with double sided tape to the lower left of the front of the card blank, keeping the top corner clear of the fold line.

I then added die cut holly leaves and ivy leaves cut from left overs of the black card. The white swirl and the Poinsettias were cut from plain white card off cuts from the printed sheet used for the bookmark and pocket.
I also added a double bow tied from organza ribbon to the lower pane (the front of the card when it is displayed open)


I added faux pearls as holly berries to keep the black and white theme with the muted colours of the image and backing papers. By adding the embellishments to the upper panel as well as the lower it means that the back of the card also looks attractive when displayed.


For the inside base of the card I used one of the page curl papers from the 'Boys to Men' CD. I think these papers lend themselves particularly well to being the base of an easel card. I also mounted this on black card and trimmed it to leave a thin border all the way round before sticking to the base of the card. The stopper was a sentiment from the 'Watercolour Memories' CD and this was mounted on a white scalloped oval and a single pearl added at the top before being stuck at the point of the page curl design to give the impression that it was holding the curl in place. Finally I added more black holly and ivy leaves to teh base to tie in with the embellishments on the rest of the card. 

By using the large sentiment as the stopper it means that even if the recipient can't wait to use their book mark the card still has a Christmas greeting for others to see.


I have entered this card in the following challenge
http://ppp-makeitmonday.blogspot.co.uk/ Anything goes linky party