About Me

My photo
Liverpool, Liverpool, United Kingdom
I have been crafting since May 2008, when in desperation to find an unusual birthday card for my Mum, I gave up looking in the shops and decided to have a go at making my own. I soon realised that crafting is addictive and I haven't brought a card since. In 2011 I completed my certificate in papercrafting as a result of the work I did as part of the course I started entering challenges on line and in magazines. I applied for design teams and also started making samples for Ooh La La Creations for their shows on Create and Craft. I have now completed my Diploma in professional crafting and most recently been runner up in the Papercrafter of the Year 2013 a competition run by Papercraft essentials magazine, I don't have a particular style I like to use elements from lots of styles and techniques, although I do love all things vintage. In 2014 I started to move more towards scrapbooking to take care of the huge family archive of photographs that were stored in my attic. I have continued cardmaking and Scrapbooking through 2015 and 2016 but have also become interested in off the page projects. I hope to be able focus on these in the future.

Wednesday, 30 October 2013

Fab n Funky Halloween

Good morning everyone,

We had so many  beautiful entries for last weeks Distress challenge.
Big THANK YOU from all of us for playing along. If you want to know if you were one of our lucky winners, then please check the Fab n Funky Challenge blog 


Now on to this weeks challenge and the theme is 

Halloween

Our sponsor this week

Bugaboo Stamps


We had some great images to work with and I chose Silhouette - Happy Halloween Cat from bugaboo stamps to make a really simple easel card. 


I printed the image onto white card stock and then coloured it using a Bright Orange Promarker, to add a mottled effect to teh background I coloured over some of the areas at random several times to get a deeper tone. 

I then printed the image again and fussy cut the cat to give a bit of dimension to the card. Finally I added some bats spiders and a pumpkin from some Halloween confetti I had left over from last year.

The stopper on the card is a piece of spider web paper that I had left over from another project. 

Tuesday, 29 October 2013

Sixteen Down Eight to go.

This week at Through the Purple Haze Challenges the theme is For the Girls. I came up with this one.


This card was all about using up bits in my craft stash. The backing papers were left overs from other projects and to bring them all together I matted them onto pale grey paper. The image is a Sarah Kay rubber stamp and it was the first ever stamp I bought. Rather than colouring her I paper pieced her clothes from the off cuts of the backing papers and then coloured the skin and hair using Spectrum Noir FS1, 2, 3, and TN1 and EB1,2,3

To make the card really girlie, I used a Martha Stewart punch to edge the grey paper behind the candy striped panels. I also used a score board and ball tool to emboss the large pink panel to give a quilted effect adding pearls at the intersections. Behind the image I added a piece of gauze left over from another project and a scrap of lace.

The Fence is just die cut from white card, and I added a die cut foliage swirl cut from a piece of the grey paper. The roses are from Hobby House and the blue sweetheart blossoms were from my stash as was the charm. A scrap of blue seam binding tied in a bow finish it off. 

The die cut pink butterfly was one left over from another project and rather than put it into a box of die cuts and risk it getting damaged because it is so delicate I used it here. 


 Above the card closed for posting.

I am entering this into the following challenges.
http://throughthepurplehazechallenges.blogspot.co.uk/- For the girls
http://abcchallenges.blogspot.co.uk/ - what's old is new again - use your old stamps.
http://hobbyhousechallenge.blogspot.co.uk/  - Roses

Monday, 28 October 2013

Food and Drink at Ooh La La Creations


Hello everyone, we had some wonderful entries for our things with wings challenge last time and you can see the winners at Ooh La La Creations Challenge blog.

This time our theme is Food and/or Drink and I have created this card using the Autumn window image from the new Shawn Jenkins CD. 


I love this image and can almost smell the apple pie as it cools on the window sill. I used one of the toppers and then added mats and layers of the patterned papers from the folder. I added a rosette folded from green card and then finished off with two tiny apples made using Martha Stewart Paper clay, the mould I used is actually to make cherries but made in green clay they work equally well for tiny apples. The final touch was three golden pearls added using cosmic shimmer pearl PVA glue.


Wednesday, 23 October 2013

It's Fab n Funky to get distressed

Good Morning everyone, It's Wednesday so that means it's a new challenge over at the Fab N Funky Challenge blog. Thanks to everyone who entered our Spots and Stripes challenge last week you can see the winners over on teh blog.

This week Beccy is the host and she has chosen the theme of s

DISTRESS

That could be distressing the edges or using distress inks or distress embossing powders
the choice is yours.

We have two fabulous sponsors for you this week


Flonzcraft

prize $20 shop voucher (plus free shipping)

also offering 12% discount in shop to all challenge entrants 


and


Who is offering 5 digis to the winner.

I was thrilled to be able to work with this gorgeous Lacy Sunshine Victorian Winter Emily image 


I coloured her in Sepia tones something I have never tried before. I used Spectrum Noir pens 
skin FS1,2,3, TN1, 2,
Hair EB3,4,5
Clothes TN1, 2,3,5 7,8 EB4,5

For the background I embossed a piece of Centura bronze coloured paper and then tore the edges 
I added pieces of patterned paper from my scraps box that were also torn at the edges. An oval f green embossed paper was used behind the fussy cut image and I added lace, the die cut lamp post and greeting, and the flowers made with Tattered Lace inter florals dies. I finished off with some liquid pearls along the lace, a wooden hanging ornament tied with bakes twine and three pretty stick pins.


I finished the inside of the card using patterned paper from the Papermania range, and added panels that were hand cut from white card. The finishing touches the curling ivy leaves at the edges cut using Tattered Lace oriental ivy die.

I am entering this card into the following challenges 

Thursday, 17 October 2013

Fourteen Down Ten to go

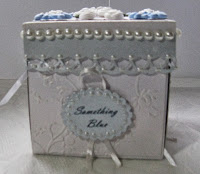
This weeks challenge at Through The Purple Haze is anything goes with a hint of food. So I came up with this little keepsake box with a surprise inside.

Materials used
Centura Pearl card stock
Centura Pearl Paper
Cosmic Shimmer PVA white Pearl
Self Adhesive Pearls
White Ribbon.
Martha Stewart Paper Clay

I started off by printing the phrases 'Something Old, Something New, Something Borrowed and Something Blue' onto the ice blue Centura pearl paper. I then stuck this to thin white card and used a nestabilities scalloped oval die to cut them out, I then glued a ribbon loop to the back of each one and edged them with the Cosmic
Shimmer PVA, pearls and put them to one side to dry.

Whilst the little plaques were drying I measured and cut the following Pieces of Centura Pearl Card stock.

1 x 27cm x 27cm for the box
1 x 10cm x 10cm for the lid
1 x 8.5 cm  x 8.5cm for the lid panel
6 x 6cm x 6cm for the inner panels and lid lining.


In addition 5 panels of the ice blue paper were also cut at 6cm x 6cm. These were embossed using a Crafter's Companion Ulitmate Pro score board to give a quilted design and these were then mounted onto the 6x6 card panels. Liquid pearls were added at the intersections, and the panels placed to one side to dry.

The 27cm square was scored at 9cm and 18 cm from Top to bottom and then again from left to right to give a cross shape on the card. the four outside squares were cut out and then embossed using an embossing folder and stuck to the outside edges of the box and the sentiment ovals previously created were stuck around the sides.
 The 10 x10 square was used to create the box lid and was scored on all sides at 1.5cm from the edge to form the lip. Once this had been stuck at the corners a 2cm strip of the ice blue paper that had been edged using a Martha Stewart punch was stuck around the edge to form the lace effect. the lace edge was also highlighted in liquid pearls and a strip of self adhesive pearls was stuck around the top to form a border.


 The 8.5 x 8.5 cm panel was embossed using an swirly patterned embossing folder and then this was stuck to top of the lid. I used flowers I had made from Martha Stewart Paper clay, using silicone moulds intended for modelling sugar paste to decorate the top of the lid and these has sparkle added in the form of stickles.

I suppose you are wondering by now what on earth this all has to do with food well the picture below reveals the surprise one the lid is lifted from the box.

Having lined the box and the box and the lid with quilted panels and added a die cut sentiment on the top and bottom panels and, heart plaques on the left and right hand panels I got to the centre piece. It may not be obvious from the picture above but seen from the side all becomes clear.


It is a little wedding cake covered in cascading roses. To make the cake I made three small boxes measuring 1cm deep and 5.5cm, 4cm, and 2 cm square and stuck them together. wrapped each tier of my cake with organza ribbon and liquid pearl trim and added white sparkling roses cascading down the sides, with a tiny double bow to finish.

So there you have it a keepsake surprise for Anything goes with a hint of food.
I am entering this project into the following challenges

http://throughthepurplehazechallenges.blogspot.co.uk/ - Anything goes with a hint of food

Wednesday, 16 October 2013

Spots and Stripes at Fab 'n' Funky

Good Morning

We had some wonderful entries in the 'It's All Rock and Roll to me Challenge' last week the winners can be found on the challenge blog at Fab 'n'Funky

This week is all about 
Spots and Stripes

We have two great sponsors for you this week and The DT were lucky enough to have images from both sponsors to play with:


with a prize of 5 digi's of the winner's choice

I chose to use 'Alannah' from Stamp Art Design by Kathryne to work with and came up with this. 


I embossed my background for my spots and used the scarlet organza ribbon edge for my stripes, then added an extra few dots with the white organza bow.

The Image is coloured using Spectrum Noirs 
Skin - FS1, FS2, FS3, TN1, TN2,
Hair GB1, GB2, GB3, GB4
Suit is CR9, CR11,DR,1 DR3
Hat and mitts JG1, JG2
Fence EB3, EB4,

I added flower soft to the edges of her hat, suit and to her boots to give a furry effect, and then added a mix of flowersoft and sparkly film to the snow to give a frosted look.

The flowers were cut from off cuts of the backing card using Tattered Lace Winter Florals dies and were then coloured using Spectrum Noirs in CR9, CR11 and DR3, the leaves were DG1 with veins added in JG1.

I added the die cut lamp post and the pins and sentiment. and finished with a little branch and pine cone at the top left corner.

Monday, 14 October 2013

Things with Wings at Ooh La La

Once again we had some marvellous entries for the 'F is for challenge' you can check out the winners at Ooh La La Creations blog

This week's challenge is about Things with Wings and I have chosen to use the latest Ooh La La creations CD 'The Shawn Jenkins' collection the images on this CD are just superb and you can buy your copy by going over to Ooh La La Creations.


I used the bright butterflies folder from the CD, and loaded it in My Craft Studio so that I could reduce the opacity of the basket weave paper and the main butterfly image. I printed tow copies of the topper one at 50% opacity and one at full opacity.

I decided to work with a landscape card and folded an A5 card to make an easel. The base is covered in the basket weave paper and a strip of Centura Pearl paper in a pretty peach colour. The stopper was cut from an off cut of the background paper on the card which was stuck to card before being die cut and the die cut happy Birthday was added. 


For the main card I cut a piece of patterned paper and stuck it to the card. I then embossed a piece of the Centura Pearl paper using an embossing board and stuck it on top to leave a narrow border, then added Gems at the intersections of the diamonds. I die cut the lighter of the two topper into an oval and added a tattered Lace die cut behind. I then cut the individual butterflies from the other topper image and stuck them over their counterparts on the lighter image to give a 3D effect. This was then stuck to the card on one side. On the  other side I made an envelope from vellum that had been printed with the same pattern as the backing paper, then added a die cut butterfly with gem body. Finally I made the bookmark from the bookmarks folder on the CD to tuck into the velum envelope and added a bow to match the ribbon on the bookmark.

I am entering this card into the following challenges.

Wednesday, 9 October 2013

It's all Rock and Roll at Fab n Funky

Hi there, firstly thanks to all those who entered our last challenge at Fab n Funky you can check our the winners over on the blog now.

This week we have the fabulous Kenny K Downloads sponsoring our challenge this week which means the DT had some fabulous digis to play with. 


 Our theme is 
Its all Rock'n'Roll to me!

This means that you can either use a music inspired theme or image for your card
or as an added twist 
You can use a rock'n'roll song as inspiration 
- in which case tell us what the song is in your post

So come on - have some fun with this one - we can't wait to see your rock'n'roll cards


The prize is a fabulous 5 digis of your choice from Kenny K downloads - so what are you waiting for!

I chose to use Vicky Lee Vicious for my card. 


She is definitely sassy and a little bit punk so when I found these papers on a My Craft Studio Essentials papers CD I just knew they would be perfect for this girl with attitude. I took the colours for Vicky from the papers and coloured her with a mixture of Spectrum Noir markers and added highlights using gel glitter pens. 
Skin Tones - FS1 FS2, FS3, TN1, TN2
Hair LV2, LV3, and purple gel glitter pen highlights 
Outfit - BG1, BG2, BG3, LV2
Boots - Silver gel pen 
Guitar Gold Glitter Gel Pen 

I die cut the letters from white card and coloured them with gold glitter gel pen before sticking them to black card and did the same with the die cut guitar I used as a stopper 


Monday, 7 October 2013

Thirteen down Eleven to go

This week at Through The Purple Haze Challenges there are two challenges the first is to use Indigo Blu stamps to make something and the second is an Anything goes Challenge. This is my entry for the Indigo Blu Challenge.


I made this hanging heart using 'Blazing Poppies' from the Rubber Stamp range, Flitter Glue and Morris Dance Mega gilding flakes.

I saw a demo using the gilding flakes on Create and Craft and fancied having a go so treated myself to a starter kit and bought the stamp because I love poppies. 

The project started life like this 

I drew a heart onto paper and then used this as a template to cut out 4 hearts from an old cornflakes packet, I glued then together using a strong adhesive and then added an extra layer cut from Kraft card to the back of the heart. Once all the layers were dry I painted them with several coats of cream acrylic paint which were allowed to dry and were sanded between coats to get a really smooth finish.

Then the real fun started, I followed the instructions for making my glue pad from the kit and stamped the image of the poppies onto the heart and then covered it with the gilding flakes. I also added a little sentiment that I have had in my stash for so long that I can't actually remember where it came from, but I love the thought behind it.


Once I had stamped and gilded the image on the heart I then 'inked' it up again using the glue pad but just inking the areas of the flowers and stamped those onto cream Centura Pearl card stock and gilded them, and cut them out and decoupaged them over the original flowers on the design on the heart. I used the glue pad to daub around the edges of the heart and add gilding. I also used glossy accents in the centre of each flower and used clear glass micro beads to create textured centres. These allow the colour of the gilding flakes to show through.

I pinned the ribbon around the edges of the heart using pearl headed pins and added a hanging loop and ribbon tails to complete.

I am quite pleased to my first foray into gilding using flitter glue and yes it is delightfully messy, and you have to be careful not to cough  or sneeze when working with them but the results are simply stunning and I have now picked up a few more colours from my local craft shop and will be experimenting with them more in the future.

I am entering this project into the following challenges
http://throughthepurplehazechallenges.blogspot.co.uk - Indigo Blu

Wednesday, 2 October 2013

Using Ribbon at Fab n Funky

Hello every one we had some fabulous entries for our button it up challenge last week and you can find the winners over on the Challenge blog at Fab n Funky

The theme for this week has been chosen by Dawn and is 

RIBBON


Our sponsor this week is the fabulous Stamp Fairy

Offering our winner a $10 voucher to spend in their shop

I made the following using the Stamp Fairy image Barry Best friends


I coloured Barry and his best friend using Spectrum Noir markers in the following shades
GB1, GB2, GB4, TN1, TN3, TN4 and PP2

I fussy cut the image and mounted him onto black card before fussy cutting again

The backing papers were freebies from a magazine and the flowers were fussy cut from one of the papers and then pearls and clear glass micro-beads were added for the centres. I fussy cut the patchwork style backing paper and matted it onto black card trimming to leave a narrow border, and the orange butterfly paper was die cut and covered in double sided sticky film and clear glass micro beads added to give a textured surface. I finished off with two computer generated sentiments and added a double Organza bow which I topped with a satin bow to finish


I am entering this card into the following challenges


Tuesday, 1 October 2013

Twelve down Twelve to go

So this week finds us at the midway point of the Challenge at Through the Purple Haze for an incredible bundle of crafting goodies. The Theme this week is Halloween and I used a dig stamp from the Simply Betty Spooky Hollow collection.


I coloured the image using a mixture of  Spectrum Noir and promarkers

Skin FS1, FS3, TN2, PP2
Hair Promarkers Cool Grey 3, 4, 5 and Shale
Clothes OR1 and Bright Orange, LV3, PL4, PL5

The purple background paper is from My Craft Studios Essential Backgrounds CD and the white spider web paper is from Ooh La La's Faithful Friends CD.

I didn't have a spider web die so I drew one free hand on white card and cut it out by hand using decoupage scissors. I stuck it t the top left of the card and then used stickles iridescent glitter glue over it and as the thread for my spider to crawl up.

I also used glitter glue on my image and as the flashes coming from her wand.

The bright Green ribbon was from my stash and the pumpkins, bats and spider were from a bag of table confetti that I picked up in my local supermarket last year.

I am entering this card into the following challenges